
Negative Reverse Applique ~ that's a bundle of rather confusing words to wrap your head around, especially when placed right next to Reverse Applique and Applique, plus throw in the differences for the Alabama Chanin methods. I Googled the definitions of these terms, and Merriam's Dictionary only listed Applique:

Applique (per Merriam's Dictionary): "a cutout decoration fastened to a larger piece of material."
Sounds easy; right? For me, though, Applique is the most time-consuming and possibly most expensive technique of the three. With Applique you begin with your base. I have used a single layer of fabric for my base successfully. If you are planning on a lot of embellishment, which adds weight, you should use two layers for your base. Alabama Chanin teaches to always use two base layers. For ease of explanation, I will use two base layers.
Begin with one plain bottom layer (for stability), right side facing up, and one top layer with your stenciled design on the right side, facing up. This is your base. You will then take a third layer of fabric and paint the mirror image of your stencil onto the back or wrong side of this fabric.
Cut one element out of the third layer; flip the cut element over so the unpainted, right side is facing up; match it to the corresponding element on your base; place the cut element on top of the corresponding element; and with a single strand of thread, whip stitch the element onto your base. Proceed element by element until your whole piece is complete. Do not cut all the elements out first, because you will have a dickens of a time trying to find the correct matching elements, like a giant jigsaw puzzle!
Applique is a beautiful treatment. An upside to Applique is it allows for no visible paint showing on your final garment: Your garment will be very stable and heavy, which will do well for a heavily embellished item. Some drawbacks are: You will have three layers of fabric, which gets expensive: You will have sprayed your stenciled design twice, which is time-consuming and adds more cost: You will need to cut each element, flip, match, and sew it down, which can be tedious. If you want a warmer garment, Applique may be your technique of choice.
When adding extra weight like these beads, one would definitely opt for two base layers.


Reverse Applique: (per yourdictionary.com) "A sewing craft in which an outline is cut from a top layer of fabric and the raw edges are turned under and stitched to expose one or more layers of fabric underneath."
This is the classic quilters' definition. In the Alabama Chanin style we use jersey fabric. With jersey fabric there is no need to turn under and stitch the raw edges as cut jersey does not fray and will simply gently roll when washed.
With Reverse Applique you have two layers of fabric. The bottom layer is plain. The top layer is stenciled or painted with your design. You will place the bottom plain layer, right side up. Next place the stenciled or painted layer on top of the bottom layer, right side up. You now have two layers of fabric, both with right sides up. Pin or baste them together. Stitch or quilt these layers together by stitching each of the elements. Inside each of the stitched elements, cut only the top or painted layer away.

The top portion of the photo has the center or painted portion cut away. The bottom portion is before it is cut away. You'll notice that if the elements are too small, I don't cut them.
Negative Reverse Applique: I could not find any definition from any dictionary sites, so here is how I learned it from Alabama Chanin.
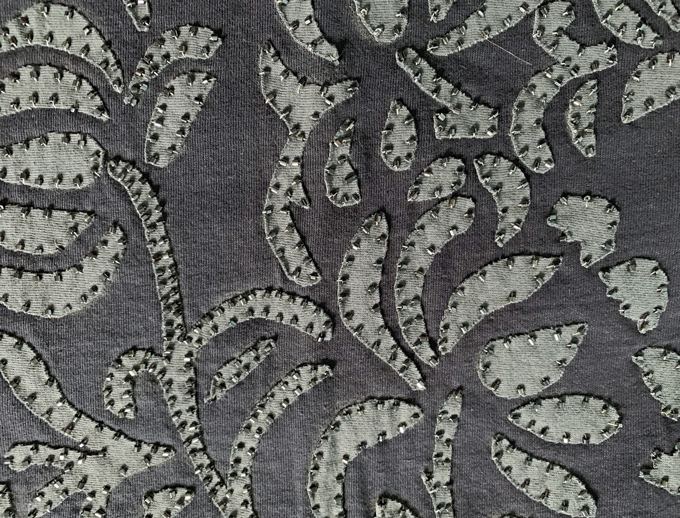
With Negative Reverse Applique you have two layers of fabric. The bottom layer is plain. The top layer is stenciled or painted with your design. You will place the bottom plain layer, right side up. Next place the stenciled or painted layer on top of the bottom layer, right side up. You now have two layers of fabric, both with right sides up. Pin or baste them together. Stitch or quilt these layers together by stitching 1/8" inside each of the elements. Cut away all of the negative space, 1/8" outside of each of the elements. You will be left with mostly painted elements, with just a thin ribbon of unpainted fabric surrounding them.
This technique leaves you with a lighter-weight garment as much of the top layer is cut away. Sometimes I will stitch right on the paint line, then cut away the negative space. This leaves more of the unpainted fabric showing on the final garment. It's best not to cut too close, less than 1/8" to the stitching or your stitches may pull through the cut fabric. Sometimes when the patterns run close together, it's difficult to leave the 1/8". In these cases, I do the best I can. Luckily, it's more visual and not in the construction. If one happens to pull through eventually, I doubt it would be noticed with so much going on. When constructing a garment, though, I adhere to this rule, as I don't want my seams popping or failing.
This technique leaves you with a lighter-weight garment as much of the top layer is cut away. Sometimes I will stitch right on the paint line, then cut away the negative space. This leaves more of the unpainted fabric showing on the final garment. It's best not to cut too close, less than 1/8" to the stitching or your stitches may pull through the cut fabric. Sometimes when the patterns run close together, it's difficult to leave the 1/8". In these cases, I do the best I can. Luckily, it's more visual and not in the construction. If one happens to pull through eventually, I doubt it would be noticed with so much going on. When constructing a garment, though, I adhere to this rule, as I don't want my seams popping or failing.

If you are not completely confused at this point, read on. I have one more technique to throw in there I've coined the Hybrid technique.


As in Reverse Applique and Negative Reverse Applique you begin with two layers. The bottom layer is plain. The top layer is stenciled or painted with your design. You will place the bottom plain layer, right side up. Next place the stenciled or painted layer on top of the bottom layer, right side up. You now have two layers of fabric, both with right sides up. Pin or baste them together. Baste each of the elements in place. Cutting all the way up to the paint or leaving a thin ribbon of unpainted fabric, your choice, cut away all of the negative space. Next, with a single strand of thread, whip stitch each of the elements in place. Take out the basting stitches. You will notice in these photos that I have left the basting stitches in place. I like the way they look. They look like veining in leaves to me, and add an extra dimension.
This Hybrid technique will not have the rolling raw edges. All those edges will be stitched down to offer a cleaner, less textural garment, similar to the Applique technique. Notice that like the Negative Reverse Applique technique, you see mostly painted elements, whereas with Applique there is no paint visible.


Here is a close up of the Hybrid technique. You can see I left a small sliver of the emerald color of the top layer. The paint is called Brownie. Below is my Hybrid Technique dress.


Here is a tea towel that has both the Reverse Applique (left-hand side) and Negative Reverse Applique (right-hand side) on the same item.


This skirt has Reverse Applique as well as some Applique. The Applique leaves are randomly placed about and are not part of the base stencil design.

I hope this helps clear up these different techniques. I highly recommend reading one of Natalie Chanin's books. She goes into greater detail, with pictures, tips, and diagrams for Applique, Reverse Applique, and Negative Reverse Applique.
There are a plethora of design choices just using these techniques, whether used alone or in conjunction. I hope you explore them all!


Patti,
ReplyDeleteI’m going to need to see these in person!
Shari
Hi Shari~ Any time! We missed you at Sit n Stitch last week.
DeleteLove all your examples. Is that the latest wrap dress by AC? It's spectacular. Elsie
ReplyDeleteThank you, Elsie. The wrap dress is not the same pattern as the published AC wrap dress. It's one I got a few years ago from the studio week. I probably looks very similar on, though.
DeleteThanks for this - very clear explanations and well supported with lovely photos!
ReplyDeleteHello Pat~ I'm glad it was helpful. Thanks for visiting.
Delete