A quilt? Hmmmm, yes. But what type? How large? Which technique to use? Reverse applique? Of course. But I adore applique as well, with some embroidered embellishing. The ribbon climbing daisies are stunning, and simple quilting is sublime. Couching offers texture and depth. I didn't want just one: I wanted them all! The light bulb went off, and giddily, greedily I thought, why not? I could have them all. Like an old-timey stitching sampler only on a larger scale, I could incorporate whatever techniques I desired. I would make an old-timey stitching sampler quilt.
The idea of making a quilt had been tumbling around inside my head for quite some time. It had to be outside the box, not your regular "exact" or "precise" quilt. I admire quilt makers, with all their edges and points that match up perfectly; but such methodical calculations make my brain hurt. My quilt would have to be different ~ organic, curvy, free-flowing. I had never made a pattern before, let alone designed a quilt. Where to start?
My favorite tablecloth had poppies (I adore poppies), stems at the edges, growing and flowering into the middle. I was enchanted and inspired by this viewpoint. This was to be my muse, the beginning spark.
I started making notes and gathering ideas, images. Wallpaper from Anthropology made my heart sing. The bunnies and mushrooms were sweet and charming, thus the woodland theme was born.
Alabama Chanin has a selection of beautiful stencils. I already owned a few of them. At that time some of their artwork was free and downloadable from their website. I had learned how to make stencils at their classic, week-long studio workshop. I made their fern and climbing daisies stencils. Natalie's first three books go into great detail on how to cut out your own stencils. I used a Japanese hole punch when making the climbing daisies stencil. It made quick work of cutting out all the tiny holes.
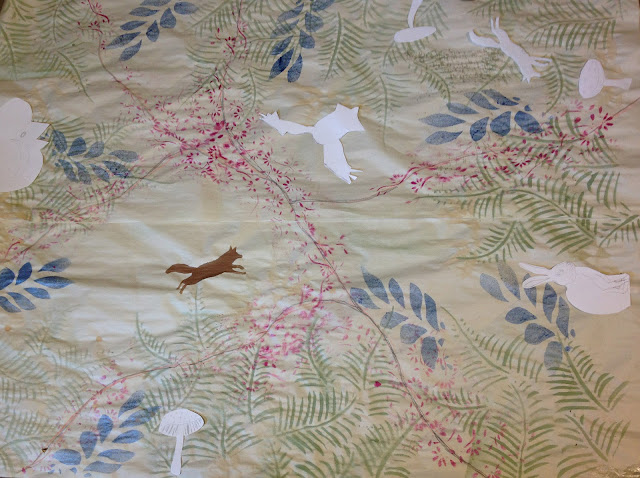
I started sketching ideas, utilizing the stencils I had. I liked bunnies and hares, but thought a jackalope would add a touch of humor.
I used the "Alabama fur" technique with the jackalope's tail. The red accents on the mushrooms are French knots.
My husband had captured a beautiful picture of an eagle in flight. I printed out the silhouette of the eagle.
You can see the eagle here, as well as a view of the sleeping fox.
Mushrooms and foxes were sketched and sized accordingly with a copier.
At our local newspaper, they have free end of rolls of paper. These large rolls came in very handy!
I put together a paper template in the dimensions I wanted the quilt to be, 60 inches by 46 inches. I drew long, curvy lines, delineating the pieces of the quilt. I knew I wanted to couch these seams to give them texture and make them look like branches. I spray painted the flowers in and about the "branches", while leaves and ferns were painted around the outside edges or forest floor. I then placed the animals, switching locations, sizing and re-sizing to make a good composition.
I traced the pattern pieces and cut them out. I added a quarter inch seam to all non-edge sides. I put in grain lines, and lettered each of the pieces.
Each pattern edge was labeled with the corresponding number of the pattern piece that would be up against it. This made it easier when putting the quilt together.
Before I cut out the actual quilt, I experimented by sewing a small sample together. Curvy seams were uncharted territory for me. When the sample was stitched together smoothly, I was ready to cut out my actual quilt. It was a little ....no, it was very unnerving when I cut into my actual yardage! Would the large pieces sew together successfully? Would everything lay okay? A leap of faith, and I cut and sprayed and stitched and cut and quilted and sewed and couched and embroidered, all the while not knowing if it would successfully come together.
Here is one of the pieces in progress. I sandwiched a swatch of blue fabric in between the front and back. Then I stitched and reverse appliqued the leaf element. The mushrooms were traced onto this piece. I then cut the mushrooms from gold colored fabric and appliqued them on. I finished with the French knots as seen above.
Here is a close up of the appliqued leaping fox. There are the ribbon climbing daisies. The ribbon is fiddley to work with, but well worth the effort.
I first sewed the quilt together, then I couched the earth colored pull into the seams with black thread. The tone on tone flowers are simply quilted. The fern is satin stitched with embroidery floss in two different colors, with the knots left showing.


This is sooo beautiful!!
ReplyDeleteThis is sooo beautiful!!
ReplyDeleteI absolutely love this! I too get too overwhelmed at the thought of mathematically perfect quilts and love the curves in yours! I love hand stitching ( I dabble in the AC method for clothing) and I’ve been wanting to make quilts for my two children in the same way. I’ve wanted to do something that will be an heirloom and stretch across generations and I think a woodland theme will be perfect! All the techniques you incorporate give the quilt such a rich quality! Thank you for the inspiration your quilt is wonderfully beautiful!
ReplyDeleteThank you so much for your kind words. I'm glad you like it! Yes, the larger swaths are much more approachable than a million tiny pieces. Happy Stitching!
DeleteA beauty!!!
ReplyDeleteThank you, Kate!!
Delete